Lets Encrypt Beta
I’m currently working on how this page is delivered to you. If you want to see the LetsEncrypt certificate in action please visit:
https://www.wjd.io/status

Working with the Let’s Encrypt python client
Things to check before you begin: #
Make sure nothing is listening on port 80 on the machine you are trying to run the client
Ensure that the domain names you are attempting to register are able to be resolved
Dont enter domains that are not explicitly whitelisted in the beta program email you received.
So to get started was pretty easy, there are directions in the email that give you the gist of it. But we want to get as secure as possible right?
Here are the included directions:
 git clone https://github.com/letsencrypt/letsencrypt
  cd letsencrypt
  ./letsencrypt-auto --agree-dev-preview --server \
      https://acme-v01.api.letsencrypt.org/directory auth
Now, that being said, we want to get as secure as possible. I found a pretty good write up on doing this with Apache2 here
In my case, I’m using NGINX running on a Raspberry Pi 2. The little badass device is primarily used as a Proxy to my blog and other items.
So according to the above link instead of the basic command:
./letsencrypt-auto
We instead want to use an RSA 4096 bit key so we run:
 ./letsencrypt-auto --agree-dev-preview --server \
      https://acme-v01.api.letsencrypt.org/directory auth --rsa-key-size 4096
We then configure NGINX to use our new fullchain.pem file that gets generated
ssl_certificate PATH/fullchain.pem;
ssl_key PATH/privkey.pem;
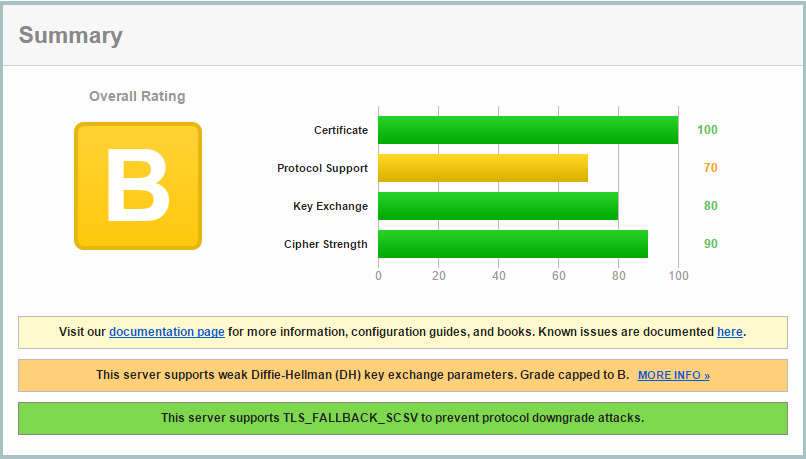
This alone will give us an overall B rating on SSL Labs
But we can do better! #
The next thing we need to do is beef up our Diffie-Helman strength a bit. To get started we’ll go ahead and generate new DHPARAMS using OPENSSL with the following command
openssl dhparam -out /etc/ssl/private/dhparams_4096.pem 4096
BTW This is going to take a while to finish. - no really. It will take a really long time, especially on the Rasp. Pi 2
Once it has finished you’ll need to update your NGINX config to use the new dhparams. While we’re at it, we’ll make a couple of other changes to beef up our security.
Be warned that doing this will limit backwards compatibility with IE6/WinXp etc.
Edit your nginx.conf file
sudo nano /etc/nginx/nginx.conf
And add/replace the following lines
ssl_ciphers "EECDH+AESGCM:EDH+AESGCM:AES256+EECDH:AES256+EDH";
ssl_protocols TLSv1 TLSv1.1 TLSv1.2;
ssl_prefer_server_ciphers on;
ssl_session_cache shared:SSL:10m;
ssl_dhparam /etc/ssl/private/dhparams_4096.pem;
With all of this done browse over to SSL Server Test and see how your newly configured domain does!
I’ll update this with my new score once the new key is finished generating :
Update #
My Raspberry Pi 2 experienced a kernel panic in the middle of generating the DH Params. Instead of restarting it I opted to launch an AWS ubuntu instance and generate it there. 40vPUs and a 160GB of RAM pumped out this file in about 10 min!
After that was all said and done I saved my nginx.conf and restarted nginx with:
sudo /etc/init.d/nginx restart
Then I re-ran the ssl test, here are the results:
